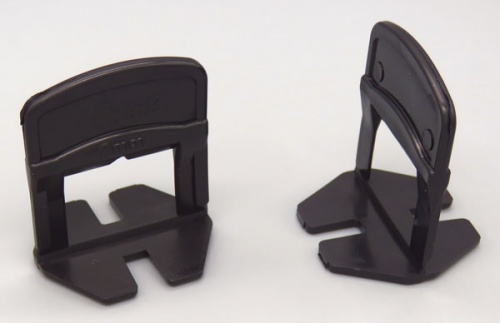
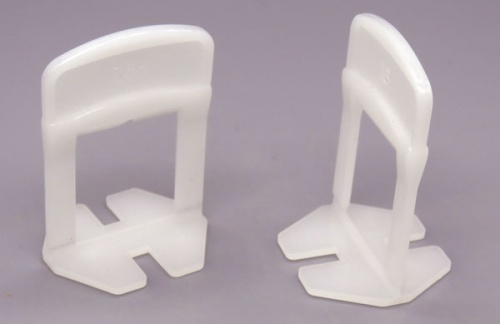
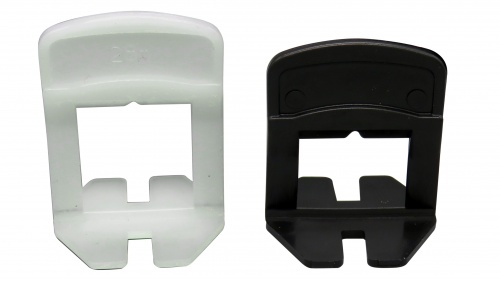
The StrataWedge D-Clip levelling system has been developed as a professional, easy to use, system to eliminate uneven planes between tiles due to imperfect screed coatings or surface variations. It permits accurate alignment of tile surfaces, acting as both leveller and spacer, and ensures regular joint widths between tiles.
Spacer Levelling D-Clips
Two ranges of Spacer Levelling Clips are available, one for tiles that are from 3mm to 12mm in thickness, the other is for tiles from 12mm to 20mm in thickness. The 3m to 12m clips are available for 1mm, 1.5mm, 2mm and 3mm joint widths. The 12mm to 20mm clips are available for 1mm or 2mm joint widths. The Wedges and the Pliers work with both sizes of clip.
Installation Guide
Spread the adhesive, place the first tile into position, and tap it down with a rubber mallet, check level with a spirit level. Insert two or more D-Clips, according to tile size, underneath the tile edges into the bed of adhesive. Place the next tile into position and tap down. Optionally insert an appropriate X-shaped or Y-shaped tile joint spacer at the tiie corner intersections to ensure perfect joint alignment.
Slide a wedge into each of the D-Clips and press into position, using the special clamping pliers, to achieve perfect alignment between the tile surfaces.
(Hint: Run a flat edge over the tile surfaces to check that the alignment is perfect and that there is no ‘lippage’). Proceed with laying and levelling the remaining tiles.
Leave until the tile adhesive is dry. The wedges and D-Clips can then be removed with a sharp tap with a rubber headed mallet, ideally in a parallel direction to the tile edge. This will cause the D-Clips to break off level with the tile base, leaving the joints ready for grouting. The Wedges can be saved for re-use.
Specifications
| 37 91941 30110 9 |
The StrataWedge D-Clip levelling system has been developed as a professional, easy to use, system to eliminate uneven planes between tiles due to imperfect screed coatings or surface variations. It permits accurate alignment of tile surfaces, acting as both leveller and spacer, and ensures regular joint widths between tiles.
Spacer Levelling D-Clips
Two ranges of Spacer Levelling Clips are available, one for tiles that are from 3mm to 12mm in thickness, the other is for tiles from 12mm to 20mm in thickness. The 3m to 12m clips are available for 1mm, 1.5mm, 2mm and 3mm joint widths. The 12mm to 20mm clips are available for 1mm or 2mm joint widths. The Wedges and the Pliers work with both sizes of clip.
Installation Guide
Spread the adhesive, place the first tile into position, and tap it down with a rubber mallet, check level with a spirit level. Insert two or more D-Clips, according to tile size, underneath the tile edges into the bed of adhesive. Place the next tile into position and tap down. Optionally insert an appropriate X-shaped or Y-shaped tile joint spacer at the tiie corner intersections to ensure perfect joint alignment.
Slide a wedge into each of the D-Clips and press into position, using the special clamping pliers, to achieve perfect alignment between the tile surfaces.
(Hint: Run a flat edge over the tile surfaces to check that the alignment is perfect and that there is no ‘lippage’). Proceed with laying and levelling the remaining tiles.
Leave until the tile adhesive is dry. The wedges and D-Clips can then be removed with a sharp tap with a rubber headed mallet, ideally in a parallel direction to the tile edge. This will cause the D-Clips to break off level with the tile base, leaving the joints ready for grouting. The Wedges can be saved for re-use.
Specifications
| 37 91941 30108 6 |
The StrataWedge D-Clip levelling system has been developed as a professional, easy to use, system to eliminate uneven planes between tiles due to imperfect screed coatings or surface variations. It permits accurate alignment of tile surfaces, acting as both leveller and spacer, and ensures regular joint widths between tiles.
Spacer Levelling D-Clips
Two ranges of Spacer Levelling Clips are available, one for tiles that are from 3mm to 12mm in thickness, the other is for tiles from 12mm to 20mm in thickness. The 3m to 12m clips are available for 1mm, 1.5mm, 2mm and 3mm joint widths. The 12mm to 20mm clips are available for 1mm or 2mm joint widths. The Wedges and the Pliers work with both sizes of clip.
Installation Guide
Spread the adhesive, place the first tile into position, and tap it down with a rubber mallet, check level with a spirit level. Insert two or more D-Clips, according to tile size, underneath the tile edges into the bed of adhesive. Place the next tile into position and tap down. Optionally insert an appropriate X-shaped or Y-shaped tile joint spacer at the tiie corner intersections to ensure perfect joint alignment.
Slide a wedge into each of the D-Clips and press into position, using the special clamping pliers, to achieve perfect alignment between the tile surfaces.
(Hint: Run a flat edge over the tile surfaces to check that the alignment is perfect and that there is no ‘lippage’). Proceed with laying and levelling the remaining tiles.
Leave until the tile adhesive is dry. The wedges and D-Clips can then be removed with a sharp tap with a rubber headed mallet, ideally in a parallel direction to the tile edge. This will cause the D-Clips to break off level with the tile base, leaving the joints ready for grouting. The Wedges can be saved for re-use.
Specifications
| 37 91941 30111 6 |
The StrataWedge D-Clip levelling system has been developed as a professional, easy to use, system to eliminate uneven planes between tiles due to imperfect screed coatings or surface variations. It permits accurate alignment of tile surfaces, acting as both leveller and spacer, and ensures regular joint widths between tiles.
Spacer Levelling D-Clips
Two ranges of Spacer Levelling Clips are available, one for tiles that are from 3mm to 12mm in thickness, the other is for tiles from 12mm to 20mm in thickness. The 3m to 12m clips are available for 1mm, 1.5mm, 2mm and 3mm joint widths. The 12mm to 20mm clips are available for 1mm or 2mm joint widths. The Wedges and the Pliers work with both sizes of clip.
Installation Guide
Spread the adhesive, place the first tile into position, and tap it down with a rubber mallet, check level with a spirit level. Insert two or more D-Clips, according to tile size, underneath the tile edges into the bed of adhesive. Place the next tile into position and tap down. Optionally insert an appropriate X-shaped or Y-shaped tile joint spacer at the tiie corner intersections to ensure perfect joint alignment.
Slide a wedge into each of the D-Clips and press into position, using the special clamping pliers, to achieve perfect alignment between the tile surfaces.
(Hint: Run a flat edge over the tile surfaces to check that the alignment is perfect and that there is no ‘lippage’). Proceed with laying and levelling the remaining tiles.
Leave until the tile adhesive is dry. The wedges and D-Clips can then be removed with a sharp tap with a rubber headed mallet, ideally in a parallel direction to the tile edge. This will cause the D-Clips to break off level with the tile base, leaving the joints ready for grouting. The Wedges can be saved for re-use.
Specifications
| 37 91941 30112 3 |
The StrataWedge D-Clip levelling system has been developed as a professional, easy to use, system to eliminate uneven planes between tiles due to imperfect screed coatings or surface variations. It permits accurate alignment of tile surfaces, acting as both leveller and spacer, and ensures regular joint widths between tiles.
Spacer Levelling D-Clips
Two ranges of Spacer Levelling Clips are available, one for tiles that are from 3mm to 12mm in thickness, the other is for tiles from 12mm to 20mm in thickness. The 3m to 12m clips are available for 1mm, 1.5mm, 2mm and 3mm joint widths. The 12mm to 20mm clips are available for 1mm or 2mm joint widths. The Wedges and the Pliers work with both sizes of clip.
Installation Guide
Spread the adhesive, place the first tile into position, and tap it down with a rubber mallet, check level with a spirit level. Insert two or more D-Clips, according to tile size, underneath the tile edges into the bed of adhesive. Place the next tile into position and tap down. Optionally insert an appropriate X-shaped or Y-shaped tile joint spacer at the tiie corner intersections to ensure perfect joint alignment.
Slide a wedge into each of the D-Clips and press into position, using the special clamping pliers, to achieve perfect alignment between the tile surfaces.
(Hint: Run a flat edge over the tile surfaces to check that the alignment is perfect and that there is no ‘lippage’). Proceed with laying and levelling the remaining tiles.
Leave until the tile adhesive is dry. The wedges and D-Clips can then be removed with a sharp tap with a rubber headed mallet, ideally in a parallel direction to the tile edge. This will cause the D-Clips to break off level with the tile base, leaving the joints ready for grouting. The Wedges can be saved for re-use.
Specifications
| 37 91941 30109 3 |
The StrataWedge D-Clip levelling system has been developed as a professional, easy to use, system to eliminate uneven planes between tiles due to imperfect screed coatings or surface variations. It permits accurate alignment of tile surfaces, acting as both leveller and spacer, and ensures regular joint widths between tiles.
Spacer Levelling D-Clips
Two ranges of Spacer Levelling Clips are available, one for tiles that are from 3mm to 12mm in thickness, the other is for tiles from 12mm to 20mm in thickness. The 3m to 12m clips are available for 1mm, 1.5mm, 2mm and 3mm joint widths. The 12mm to 20mm clips are available for 1mm or 2mm joint widths. The Wedges and the Pliers work with both sizes of clip.
Installation Guide
Spread the adhesive, place the first tile into position, and tap it down with a rubber mallet, check level with a spirit level. Insert two or more D-Clips, according to tile size, underneath the tile edges into the bed of adhesive. Place the next tile into position and tap down. Optionally insert an appropriate X-shaped or Y-shaped tile joint spacer at the tiie corner intersections to ensure perfect joint alignment.
Slide a wedge into each of the D-Clips and press into position, using the special clamping pliers, to achieve perfect alignment between the tile surfaces.
(Hint: Run a flat edge over the tile surfaces to check that the alignment is perfect and that there is no ‘lippage’). Proceed with laying and levelling the remaining tiles.
Leave until the tile adhesive is dry. The wedges and D-Clips can then be removed with a sharp tap with a rubber headed mallet, ideally in a parallel direction to the tile edge. This will cause the D-Clips to break off level with the tile base, leaving the joints ready for grouting. The Wedges can be saved for re-use.
Specifications
| 37 91941 30113 0 |
The StrataWedge D-Clip levelling system has been developed as a professional, easy to use, system to eliminate uneven planes between tiles due to imperfect screed coatings or surface variations. It permits accurate alignment of tile surfaces, acting as both leveller and spacer, and ensures regular joint widths between tiles.
Spacer Levelling D-Clips
Two ranges of Spacer Levelling Clips are available, one for tiles that are from 3mm to 12mm in thickness, the other is for tiles from 12mm to 20mm in thickness. The 3m to 12m clips are available for 1mm, 1.5mm, 2mm and 3mm joint widths. The 12mm to 20mm clips are available for 1mm or 2mm joint widths. The Wedges and the Pliers work with both sizes of clip.
Installation Guide
Spread the adhesive, place the first tile into position, and tap it down with a rubber mallet, check level with a spirit level. Insert two or more D-Clips, according to tile size, underneath the tile edges into the bed of adhesive. Place the next tile into position and tap down. Optionally insert an appropriate X-shaped or Y-shaped tile joint spacer at the tiie corner intersections to ensure perfect joint alignment.
Slide a wedge into each of the D-Clips and press into position, using the special clamping pliers, to achieve perfect alignment between the tile surfaces.
(Hint: Run a flat edge over the tile surfaces to check that the alignment is perfect and that there is no ‘lippage’). Proceed with laying and levelling the remaining tiles.
Leave until the tile adhesive is dry. The wedges and D-Clips can then be removed with a sharp tap with a rubber headed mallet, ideally in a parallel direction to the tile edge. This will cause the D-Clips to break off level with the tile base, leaving the joints ready for grouting. The Wedges can be saved for re-use.
Specifications
The StrataWedge D-Clip levelling system has been developed as a professional, easy to use, system to eliminate uneven planes between tiles due to imperfect screed coatings or surface variations. It permits accurate alignment of tile surfaces, acting as both leveller and spacer, and ensures regular joint widths between tiles.
Spacer Levelling D-Clips
Two ranges of Spacer Levelling Clips are available, one for tiles that are from 3mm to 12mm in thickness, the other is for tiles from 12mm to 20mm in thickness. The 3m to 12m clips are available for 1mm, 1.5mm, 2mm and 3mm joint widths. The 12mm to 20mm clips are available for 1mm or 2mm joint widths. The Wedges and the Pliers work with both sizes of clip.
Installation Guide
Spread the adhesive, place the first tile into position, and tap it down with a rubber mallet, check level with a spirit level. Insert two or more D-Clips, according to tile size, underneath the tile edges into the bed of adhesive. Place the next tile into position and tap down. Optionally insert an appropriate X-shaped or Y-shaped tile joint spacer at the tiie corner intersections to ensure perfect joint alignment.
Slide a wedge into each of the D-Clips and press into position, using the special clamping pliers, to achieve perfect alignment between the tile surfaces.
(Hint: Run a flat edge over the tile surfaces to check that the alignment is perfect and that there is no ‘lippage’). Proceed with laying and levelling the remaining tiles.
Leave until the tile adhesive is dry. The wedges and D-Clips can then be removed with a sharp tap with a rubber headed mallet, ideally in a parallel direction to the tile edge. This will cause the D-Clips to break off level with the tile base, leaving the joints ready for grouting. The Wedges can be saved for re-use.


